These last few weeks I’ve been experimenting with Generative Art, using PHP. You can see the evolution of my latest series on Twitter. Generative Art is creating artworks through programming. Generative art has a few different names, Procedural art and creative coding are common alternatives.
PHP is not a common language for generative art, JavaScript is one of the more common options, but really you can use any programming language that can create images and files.
I chose PHP firstly because I know it pretty well so can work quickly, and secondly (and most importantly) because I can use it to save images to the harddisk. If it wasn’t for saving images I would probably use JavaScript since that will allow me to add controls for dynamically editing images in real time – but this would make saving images a lot more difficult.
Often generative art is based upon drawing lines or patterns using algorithms, but this isn’t the sort of art I like. Some of these artworks are amazing, but I much prefer making things inspired by games and movies since those are the sorts of things I enjoy the most.
As such, the works I’ve made are pixel art inspired by retro games. So far I’ve produced 2 series of artworks – one a set of avatars, and one a set of isometric pixel cities – and they are listed on OpenSea (if you’re interested in NFT’s).
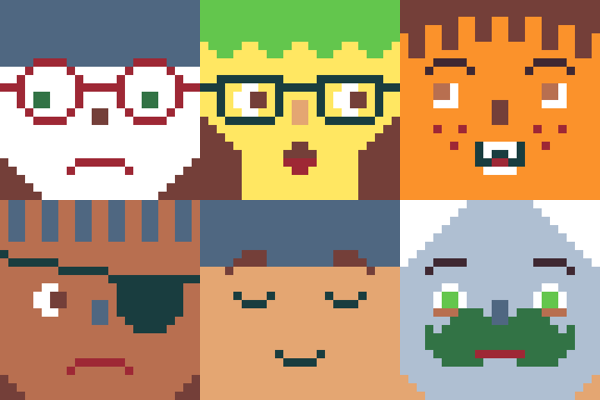
Pixel Faces generated with PHP
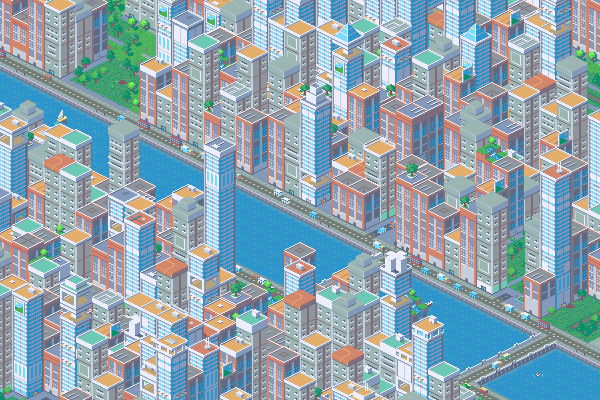
Pixelated Isometric City generated with PHP
Whilst posting about creating these images on Twitter I have been asked how I made them, so this is an article explaining how to create generative artworks with PHP.
Coding Standards
Honestly – I haven’t put much effort into coding standards for my generative art demos. These projects tend to be something I work on for a week or two and then leave to one side. As such I use the following rules:
- Use my personal coding formatting. Mostly I follow the WordPress coding standards since it’s drummed into me and so I do it without thinking.
- Only comment what isn’t immediately obvious.
- Do what works, and only refactor when it becomes too much effort to work with it as it is.
I want to get results quickly so I don’t spend much time thinking about code structure. The iso cities project is currently about 1500 lines of code, and it’s all in a single file. I use globals and a huge amount of constants so that I can easily tweak variables without hunting through the code.
There are no doubt better ways to do things, but I don’t really care if the code is a mess. For commercial projects I comment endlessly and I try to keep things as structured as possible, since I don’t know when I will need to change things; but these projects tend to be ones I work on for a week or two then don’t look at again, so it doesn’t matter to me. The result is the important part.
That said, I have made some example projects for this article, and I have commented them quite extensively to try and make the code as easy to understand as possible. If anything isn’t clear then add a comment and I’ll update the examples as best I can.
A Simple Random Image
For the avatars project I created the simplest thing I could. I created the face in layers (using assets I drew), and then used PHP to layer up the different parts randomly. Doing this I could quickly test and tweak the assets and then save loads of them to files to be added to OpenSea.
When using PHP I use the GD library, which often comes bundled with PHP installs. I run PHP with MAMP locally so that I can work quickly. I know there are more ‘trendy’ ways to run a local webserver but MAMP is super simple and I have it running all the time anyway so creating a folder and writing some code is all I have to do to get something working.
I don’t do anything with databases, everything is totally random. The beauty of generative art is that you can create thousands of different artworks instantly, so there’s no need to be precious or store anything long term. I really enjoy it when I get to the stage where I like (almost) everything the algorithm creates.
To create the avatars I manually draw a whole bunch of images (info on how in a bit), with the same dimensions, for each facial features, dozens of eyes, noses, mouths, and hair and then place each of these parts in different folders grouped by their type. I can then layer them one on top of the other.
In pseudo code the process for creating a random avatar is:
- Create an image (
imagecreatetruecolor) - Get an array of all the possible parts for the first layer (using PHP’s
glob) -
Shufflethe parts and then output the first item in the array (imagecreatefrompng>imagecopy). - Repeat for each layer.
- Save the image (
imagepng).
You can download the code on Github.
If you know about NFT’s you will probably have seen that there’s a lot of avatar projects (iinicluding the WordPress Web3 Wapuus). They all use a variation of the code here (probably not in PHP), they’re layering different pictures to make a brand new image – with enough parts you can create a lot of different, unique, avatars very quickly.
In my image stacks example I used 9 eye images, 5 mouth images, and 7 skin images – which has 315 unique combinations (9 * 5 * 7). If you added on hair, and glasses (and whatever else), you could very quickly get into tens of thousands of possible designs.
If you decide to have a go at something like this then you need to make sure to make the different images very distinctive so that you don’t end up with insignificant differences that nobody will spot.
Creating the art assets
My generative art starts with pre-drawn assets that I then combine in different combinations. It’s possible to create assets entirely from scratch with PHP but that doesn’t interest me, I like to have some artistic control. Because of the video games influence I have created everything as pixel art.
I like pixel art, it’s something I started dabbling with in the early 90’s using Paintbrush on the PC. I started by copying the images I found in video game magazines pixel by pixel. These days I use Aseprite to create pixel art. Aseprite is awesome!
Aseprite is an art application designed specifically for pixel art, and as such it has a rather unique interface. I’m quite specific with interfaces on my Mac, I don’t like them to be weird/ non-standard. I like everything to look like it belongs, but for Aseprite I will make an exception – the interface fits the use perfectly and I really enjoy using it. Aseprite is a paid app but I would happily pay for it again – it brings me joy to use it, and there’s not many apps that do that.
I included the .aseprite files in the repository so you can use them as a starting point if you want to make your own variations.
Tile based generative art
If you have ever played 2d video games you will have seen levels created with 2d grids of tiles. Having worked at a video games company for 11 years, and made video games as a hobby for even longer, this sort of thing comes naturally to me, but I’ve not worked with Isometric grids before – so my next peice of art was a little more work.
I decided to make a generative Isometric Pixel Art City and so I have created a simple demo to show how to get started with this as well.
The basic principle is that you have a multi dimensional array (an array of arrays) that stores information about the different tiles in the world. You then loop through the arrays and output the specified tiles.
To do this I keep all of the tiles in a single image and then draw the individual tiles as required. This is the way video games do it, but you could use separate images if you prefer.
For the isometric city the code looked something like this:
- Create the nested city arrays.
- Decide where everything goes using some simple algorithms and update the city arrays accordingly (place roads, place parks, place rivers).
- Loop through the arrays and draw the relevant tiles. If a tile has space for a building create a random building and draw it on top of the tile.
- Apply image effects.
As I mentioned I hadn’t worked with isometric grids before but it wasn’t that different to working with a square grid. The biggest change was in how I calculated the position of each tile. I used this tutorial to work out how to calculate the positions.
Besides positioning the tiles the other thing to make sure to do with isometric drawing is that you draw things from back to front so that the front objects cover the back ones. Because of this I draw everything related to each tile in one go. I draw the tile, then I draw the decorations (trees and people etc), then I draw the building. If I drew them separately then they may not layer as intended.
Creating the buildings
Like the landscape the buildings were made up of tiles as well. I had a collection of ground floor, middle floor, and top floor images. I would pick a random ground floor tile, then a collection of middle floors, and then a matching top floor – then draw them one at a time, starting at the bottom so that the top isn’t covered up.
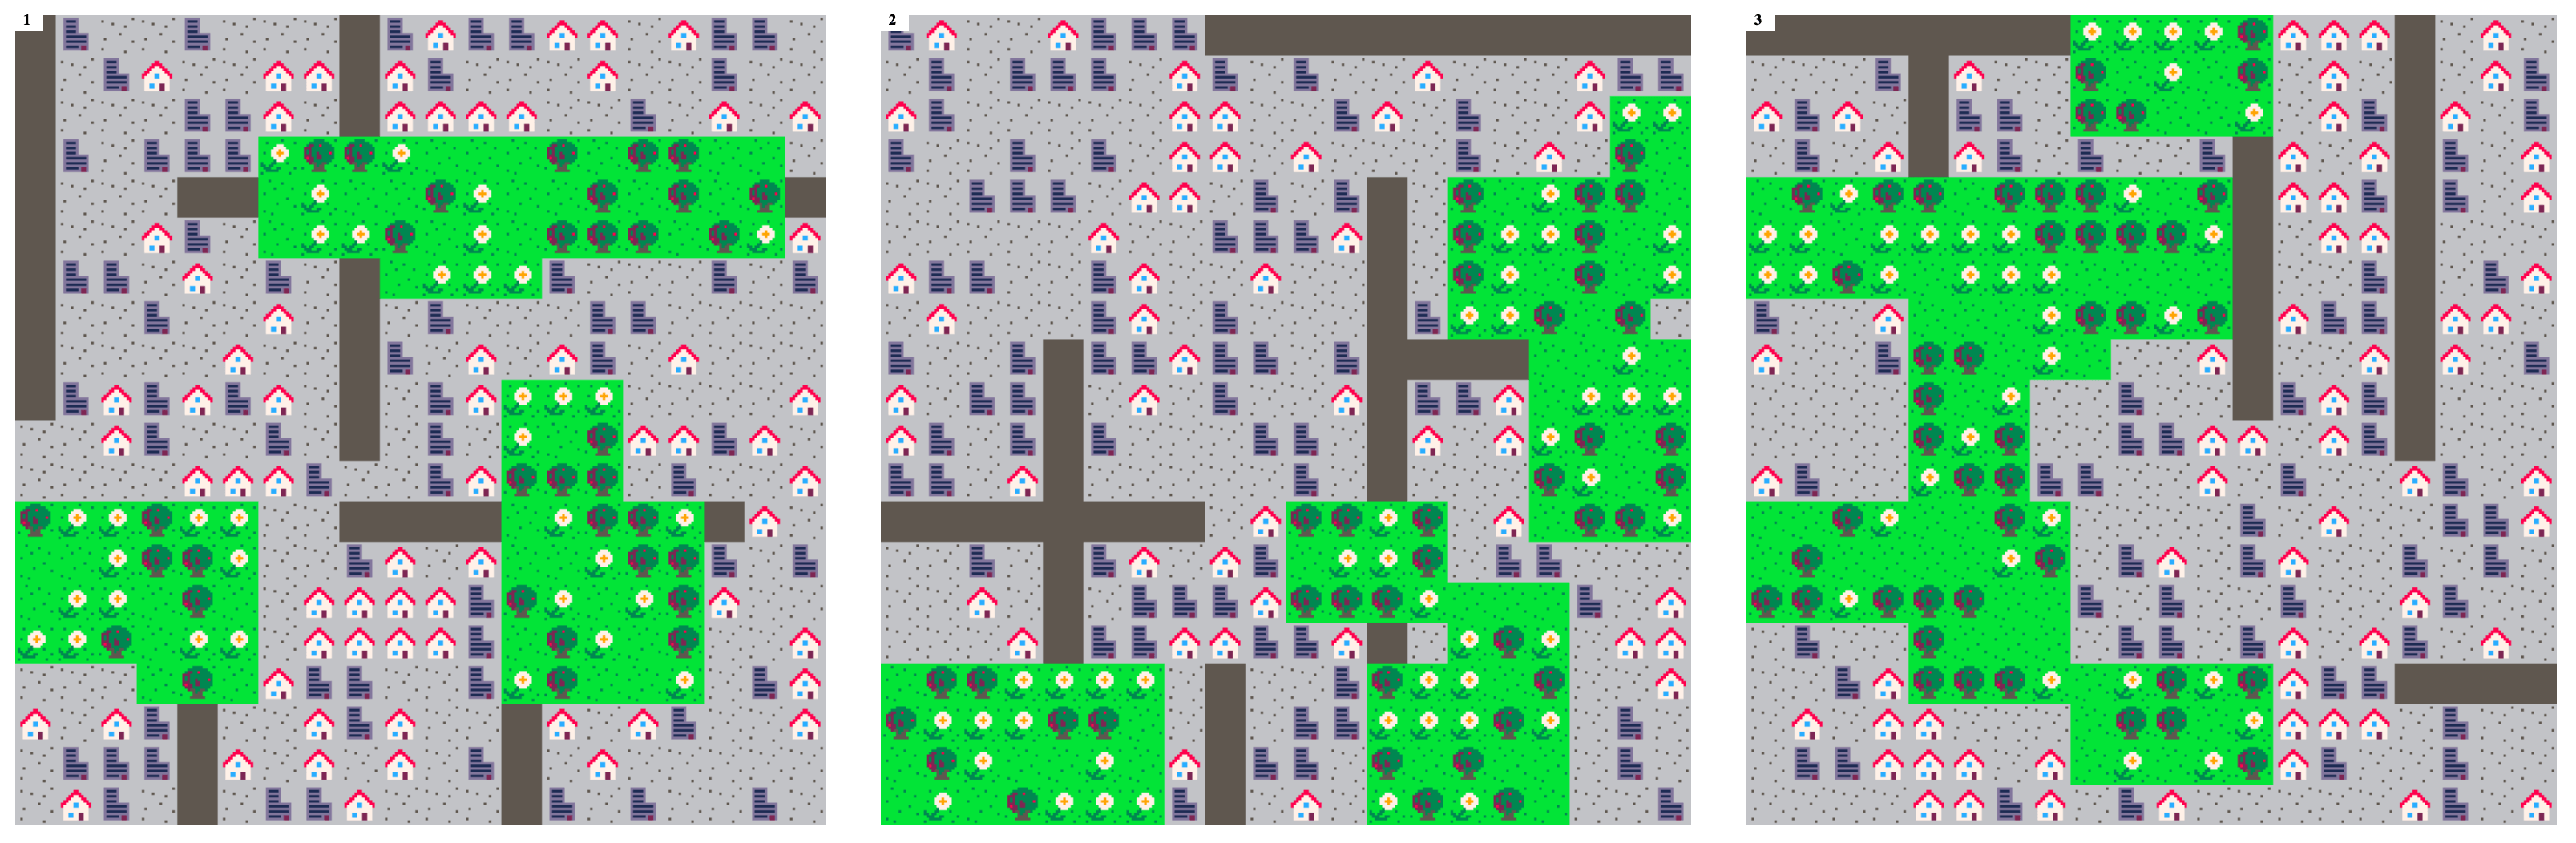
A Grid Example
The example code for this grid demo is quite a bit longer than the image stacks demo. A lot of the extra code is used for laying out the roads and parks.
Like the isometric city I am drawing roads and parks, and picking the tiles from a default single tileset image. The grid is a square one, not isometric, but the principle is exactly the same.
For the example I am using a quick tileset I made in about 5 minutes (and spent hours and hours on the ones for my Iso city).
The process for creating the city tiles is something like:
- Create the image and load the assets.
- Initialize the world array.
- Add the roads.
- Add the parks.
- Draw everything.
- Save the image.
You can download the code on Github.
Roads and Parks
The most complicated bit of the code is where I add the roads and parks. These are just randomly placed lines (roads) and squares (parks), that I then add to the world array using the relevant index. The complexity comes from working out the sizes and directions of the different elements.
Once you understand the basic principle it’s relatively easy to add rivers, and bridges, and paths in the parks. The hard bit is tweaking the values so that you can consistently get an appealing layout.
In my Iso version I didn’t put much effort into making sure all the different items were contained in the world array. The array could be larger in any direction, but because I always looped through the array using the sizes I defined (GRID_WIDTH and GRID_HEIGHT) these out of bounds properties were ignored.
What else?
The process of creating images using PHP is relatively straightforward; you can do a lot with a small amount of functions but GD has a vast amount of functions that can do all sorts of other things.
You can draw shapes, manipulate individual pixels, apply filters. There’s loads of potential. I have ideas for a whole stack of different sets of art and I hope to keep making them for a while yet.
Let me know if you have any questions, or ideas on Twitter.
How was it for you? Let me know on BlueSky or Mastodon
Link to this page
Thanks for reading. I'd really appreciate it if you'd link to this page if you mention it in your newsletter or on your blog.